OpenCL环境安装配置

由于我使用的机器是MacBook Pro 2020,mac系统里面已经集成了OpenCL的SDK,所以不需要去另外下载,只需要在Xcode工程中将其加入进来就可以进行OpenCL的开发了。下面展示的是工程文件中配置OpenCL环境的过程。

(1)首先在Xcode工程文件的Build Phases下导入OpenCL的库文件。

(2)导入后,就可以看到在旁边的文件栏有OpenCL的.framework文件。

(3)然后就是在相应的cpp文件中写入对应的头文件即可。

这样OpenCL在Xcode工程文件内的编译环境就配置好了。

本机设备参数分析

这里方法是使用OpenCL的代码进行设备参数信息的输出。由于代码过长而且与并行计算相关性不大就不予展示。

所以下面就是对OpenCL代码的输出进行分析。

首先是本机OpenCL的版本,是OpenCL1.2。

然后下面可以看到本机的两个Device,一个是CPU,一个是GPU。

这里重点描述GPU的硬件设备参数,主要信息如下:

GPU型号: Intel(R) Iris(TM) Plus Graphics

最大计算单元个数(work group): 64

最大work item维度: 3

work item每个维度的容量: 256

work group容量: 256

该Device的id: 0x7fff0000

global的内存大小: 1610612736

device的缓存大小: 65536

device的local内存大小: 65536

向量运算代码分析与实验

代码如下

1
2
3
4
5
6
7
8
9
10
11
12
13
14
15
16
17
18
19
20
21
22
23
24
25
26
27
28
29
30
31
32
33
34
35
36
37
38
39
40
41
42
43
44
45
46
47
48
49
50
51
52
53
54
55
56
57
58
59
60
61
62
63
64
65
66
67
68
69
70
71
72
73
74
75
76
77
78
79
80
81
82
83
84
85
86
87
88
89
90
91
92
93
94
95
96
97
98
99
100
101
102
103
104
105
106
107
108
109
110
111
112
113
114
115
116
117
118
119
120
121
122
123
124
125
126
127
128
129
130
131
132
133
134
135
136
137
138
139
140
141
142
143
144
145
146
147
148
149
150
151
152
153
154
155
156
157
158
159
160
161
162
163
164
165
166
167
168
169
170
#include <stdio.h>
#include <stdlib.h>
#include <math.h>
#include <OpenCL/opencl.h>
#include <iostream>

using namespace std;
// OpenCL kernel. Each work item takes care of one element of c
#define KERNEL(...) #__VA_ARGS__

const char *kernelSource = KERNEL(
_Pragma ("OPENCL EXTENSION cl_khr_fp64:enable")
__kernel void vecAdd( __global float *a,
__global float *b,
__global float *c,
const unsigned int n)
{
//Get our global thread ID
int id = get_global_id(0);

//Make sure we do not go out of bounds
if (id < n)
{
c[id] = a[id] + b[id];
}
}
);
int main( int argc, char* argv[] )
{
int i=0;
size_t globalSize, localSize;
cl_int err;
cl_event event;
float sum = 0.;

// Length of vectors
// unsigned int n = 100000;
int n = 10000000;
/*
// Host input vectors
double *h_a;
double *h_b;
// Host output vector
double *h_c;
*/

// Host input vectors
float *h_a;
float *h_b;
// Host output vector
float *h_c;

// Device input buffers
cl_mem d_a;
cl_mem d_b;
// Device output buffer
cl_mem d_c;

cl_platform_id platform; // OpenCL platform
cl_device_id device_id; // device ID
cl_context context; // context
cl_command_queue queue; // command queue
cl_program program; // program
cl_kernel kernel; // kernel

// Size, in bytes, of each vector
size_t bytes = n * sizeof(float);

// Allocate memory for each vector on host
h_a = (float*)malloc(bytes);
h_b = (float*)malloc(bytes);
h_c = (float*)malloc(bytes);
// Initialize vectors on host

for( i = 0; i < n; i++ ){
h_a[i] = sinf(i)*sinf(i);
h_b[i] = cosf(i)*cosf(i);
}
// size_t globalSize, localSize;

//cl_int err;

// Number of work items in each local work group
localSize = 64;

// Number of total work items - localSize must be devisor
globalSize =(size_t)ceil(n/(float)localSize)*localSize;

// Bind to platform
err = clGetPlatformIDs(1, &platform, NULL);

// Get ID for the device
err = clGetDeviceIDs(platform, CL_DEVICE_TYPE_GPU, 1, &device_id, NULL);

// Create a context
context = clCreateContext(0, 1, &device_id, NULL, NULL, &err);

// Create a command queue
//queue = clCreateCommandQueue(context, device_id, 0, &err);
queue = clCreateCommandQueue(context, device_id, CL_QUEUE_PROFILING_ENABLE, &err);

// Create the compute program from the source buffer
program = clCreateProgramWithSource(context, 1,
(const char **) & kernelSource, NULL, &err);

// Build the program executable
clBuildProgram(program, 0, NULL, NULL, NULL, NULL);

// Create the compute kernel in the program we wish to run
kernel = clCreateKernel(program, "vecAdd", &err);

// Create the input and output arrays in device memory for our calculation
d_a = clCreateBuffer(context, CL_MEM_READ_ONLY, bytes, NULL, NULL);
d_b = clCreateBuffer(context, CL_MEM_READ_ONLY, bytes, NULL, NULL);
d_c = clCreateBuffer(context, CL_MEM_WRITE_ONLY, bytes, NULL, NULL);

// Write our data set into the input array in device memory
err = clEnqueueWriteBuffer(queue, d_a, CL_TRUE, 0,
bytes, h_a, 0, NULL, NULL);
err |= clEnqueueWriteBuffer(queue, d_b, CL_TRUE, 0,
bytes, h_b, 0, NULL, NULL);

// Set the arguments to our compute kernel
err = clSetKernelArg(kernel, 0, sizeof(cl_mem), &d_a);
err |= clSetKernelArg(kernel, 1, sizeof(cl_mem), &d_b);
err |= clSetKernelArg(kernel, 2, sizeof(cl_mem), &d_c);
err |= clSetKernelArg(kernel, 3, sizeof(unsigned int), &n);

// Execute the kernel over the entire range of the data set
err = clEnqueueNDRangeKernel(queue, kernel, 1, NULL, &globalSize, &localSize,
0, NULL, &event);

// Wait for the command queue to get serviced before reading back results
clFinish(queue);
cl_ulong time_start;
cl_ulong time_end;

clGetEventProfilingInfo(event, CL_PROFILING_COMMAND_START, sizeof(time_start), &time_start, NULL);
clGetEventProfilingInfo(event, CL_PROFILING_COMMAND_END, sizeof(time_end), &time_end, NULL);

double times = time_end - time_start;
printf("OpenCL Kernel Execution time is: %0.4f\n", times / 1000000.0);

// Read the results from the device
clEnqueueReadBuffer(queue, d_c, CL_TRUE, 0, bytes, h_c, 0, NULL, NULL );

//Sum up vector c and print result divided by n, this should equal 1 within error
//double sum = 0;
for(i=0; i<n; i++)
{
sum += h_c[i];
}
printf("final result: %lf\n", sum/n);

// release OpenCL resources
clReleaseMemObject(d_a);
clReleaseMemObject(d_b);
clReleaseMemObject(d_c);
clReleaseProgram(program);
clReleaseKernel(kernel);
clReleaseCommandQueue(queue);
clReleaseContext(context);

//release host memory
free(h_a);
free(h_b);
free(h_c);

return 0;
}

这里进行代码的详细分析,后面的PI计算相似的内容就不再赘述了。

首先是一个可变长的宏,用来以参数的形式定义kernel函数。

1
#define KERNEL(...) #__VA_ARGS__

接下来用字符串的形式去定义kernel函数,这样它不会与host的代码一起编译,在调用时才会被编译。同时,为了OpenCL对64位浮点运算的支持,需要加一个如下的声明。

1
_Pragma ("OPENCL EXTENSION cl_khr_fp64:enable")

但是这里我们只用到了float,float类型的参数是不需要这样的声明的。

然后是对kernel内容的解释,首先要获取当前所在work item的global id,因为由上面的GPU信息可以知道,id可以有三个维度,但是我们做的是向量加法,所以只需要用到它的第一个维度,所以里面的参数为0。每个work item负责结果向量中一个位置的计算,对应如下代码。

1
2
3
4
5
6
7
8
//Get our global thread ID
int id = get_global_id(0);

//Make sure we do not go out of bounds
if (id < n)
{
c[id] = a[id] + b[id];
}

这样就定义好了kernel函数,也就是并行的部分。

下面开始为OpenCL在本机的运行做准备。

因为我们的向量加法,既要在host输入,也要在device中并行计算。所以要在host和device上分别开辟相应的空间。然后在host的变量内存空间对两个向量进行赋值,一个是cos^2(x)一个是sin^2(x),这样保证每个元素相加得到的结果为1。

1
2
3
4
5
6
7
8
9
10
11
// Host input vectors
float *h_a;
float *h_b;
// Host output vector
float *h_c;

// Device input buffers
cl_mem d_a;
cl_mem d_b;
// Device output buffer
cl_mem d_c;

下面开始设定并行计算的global size和local size,其中local size是指每个work group内的work item数目,其中global size是指所有work group内的work item数目之和,也就是所有参与并行计算的work item数目。

这里需要让每个work item负责输出向量一个位置的运算,所以global size不仅需要是local size的整数倍,而且还要大于等于向量的长度。
所以代码如下。

1
2
3
4
5
// Number of work items in each local work group
localSize = 64;

// Number of total work items - localSize must be devisor
globalSize =(size_t)ceil(n/(float)localSize)*localSize;

然后获取要使用的platform id,它可以看作是一个handel,用来获取相应的device id,也就是上面设备信息给出的0x7fff0000,然后再根据它来获取设备当前的运行状态或运行环境,从而创建命令队列。

1
2
3
4
5
6
7
8
9
10
11
12
// Bind to platform
err = clGetPlatformIDs(1, &platform, NULL);

// Get ID for the device
err = clGetDeviceIDs(platform, CL_DEVICE_TYPE_GPU, 1, &device_id, NULL);

// Create a context
context = clCreateContext(0, 1, &device_id, NULL, NULL, &err);

// Create a command queue
//queue = clCreateCommandQueue(context, device_id, 0, &err);
queue = clCreateCommandQueue(context, device_id, CL_QUEUE_PROFILING_ENABLE, &err);

这里注意到在创建命令队列时与源代码不同的是我加入了参数CL_QUEUE_PROFILING_ENABLE,用来获取kernel的运行时间。方便后面的实验。

然后就是将以变量形式声明的kernel进行实例化,代码运行至这里才会进行这个kernel函数的编译。

1
2
3
4
5
6
7
8
9
// Create the compute program from the source buffer
program = clCreateProgramWithSource(context, 1,
(const char **) & kernelSource, NULL, &err);

// Build the program executable
clBuildProgram(program, 0, NULL, NULL, NULL, NULL);

// Create the compute kernel in the program we wish to run
kernel = clCreateKernel(program, "vecAdd", &err);

下面是在Device中为上面需要的内存开辟地址空间,并且从host的内存中写入Device的内存中。

1
2
3
4
5
6
7
8
9
10
// Create the input and output arrays in device memory for our calculation
d_a = clCreateBuffer(context, CL_MEM_READ_ONLY, bytes, NULL, NULL);
d_b = clCreateBuffer(context, CL_MEM_READ_ONLY, bytes, NULL, NULL);
d_c = clCreateBuffer(context, CL_MEM_WRITE_ONLY, bytes, NULL, NULL);

// Write our data set into the input array in device memory
err = clEnqueueWriteBuffer(queue, d_a, CL_TRUE, 0,
bytes, h_a, 0, NULL, NULL);
err |= clEnqueueWriteBuffer(queue, d_b, CL_TRUE, 0,
bytes, h_b, 0, NULL, NULL);

然后对kernel函数进行参数的传递,然后开始并行的运算。

1
2
3
4
5
6
7
8
9
// Set the arguments to our compute kernel
err = clSetKernelArg(kernel, 0, sizeof(cl_mem), &d_a);
err |= clSetKernelArg(kernel, 1, sizeof(cl_mem), &d_b);
err |= clSetKernelArg(kernel, 2, sizeof(cl_mem), &d_c);
err |= clSetKernelArg(kernel, 3, sizeof(unsigned int), &n);

// Execute the kernel over the entire range of the data set
err = clEnqueueNDRangeKernel(queue, kernel, 1, NULL, &globalSize, &localSize,
0, NULL, &event);

最后等待命令队列的相应,从而完成并行计算的部分,最后要对设备上的一些内存空间进行释放。

这里为了方便实验,进行了kernel代码运行时间的计算,使用的是OpenCL自带的函数,操作如下所示。

1
2
3
4
5
6
7
8
9
10
// Wait for the command queue to get serviced before reading back results
clFinish(queue);
cl_ulong time_start;
cl_ulong time_end;

clGetEventProfilingInfo(event, CL_PROFILING_COMMAND_START, sizeof(time_start), &time_start, NULL);
clGetEventProfilingInfo(event, CL_PROFILING_COMMAND_END, sizeof(time_end), &time_end, NULL);

double times = time_end - time_start;
printf("OpenCL Kernel Execution time is: %0.4f\n", times / 1000000.0);

实验

这里我们探究随着local size,也就是每个work group内的work item数目的变化,运行效率(计算时间)怎么变化。

为了对比明显,这里的数据规模令n = 10000000,然后在local size分别为1,2,4,8,16,32,64的情况下进行实验。

1 2 4 8 16 32 64
t/ms 53.5526 25.3358 13.0841 7.8111 3.5446 2.9774 2.8876

可以发现随着Local Size数的增加,计算时间逐渐减小,计算效率逐渐增加,但是增加的幅度越来越小,越来越趋于平稳。

原因是,当Local Size比较小时,64个work group无法为所有的元素计算提供资源,只能串行地进行多次并行的计算,来达到完成计算任务的目的。所以也就增加了计算时间消耗。

下面探究在local size为64的情况下,随着数据规模的增加,计算效率的变化情况。这里的数据规模我们取10000、100000、1000000、10000000、100000000。

10000 100000 1000000 10000000 100000000
t/ms 0.0264 0.0674 0.4833 2.8852 28.6238

可以发现随着数据规模的增加,一开始的时间消耗增长较慢,后来就几乎与数据规模的增长规模相同了。

原因就是当数据规模没那么大时,所有work group的所有work item资源没有被全部利用,当增加数据规模,可以使用更多的并行资源,从而与计算时间的增加进行平衡。但是当数据规模很大时,总共需要的work item数目超过了本机可以提供的数目(256 * 64),再增加数据规模,增加的时间就不是并行后的结果了,而是串行地等待前面的并行计算完,之后的再进行并行计算,所以时间的增量几乎就是数据规模的增量。

PI值运算代码分析与实验

代码如下

1
2
3
4
5
6
7
8
9
10
11
12
13
14
15
16
17
18
19
20
21
22
23
24
25
26
27
28
29
30
31
32
33
34
35
36
37
38
39
40
41
42
43
44
45
46
47
48
49
50
51
52
53
54
55
56
57
58
59
60
61
62
63
64
65
66
67
68
69
70
71
72
73
74
75
76
77
78
79
80
81
82
83
84
85
86
87
88
89
90
91
92
93
94
95
96
97
98
99
100
101
102
103
104
105
106
107
108
109
110
111
112
113
114
115
116
117
118
119
120
121
122
123
124
125
126
127
128
129
130
131
132
133
134
135
136
137
138
139
140
141
142
#include <stdio.h>
#include <stdlib.h>
#include <string.h>
#include <math.h>
#include <OpenCL/opencl.h>


// OpenCL kernel. many workGroups compute n iterations
#define KERNEL(...) #__VA_ARGS__
const char * kernelSource = KERNEL(
__kernel void Pi(__global float *workGroupBuffer, // 0..NumWorkGroups-1
__local float *insideWorkGroup, // 0..workGroupSize-1
const uint n, // Total iterations
const uint chunk) // Chunk size
{
const uint lid = get_local_id(0);
const uint gid = get_global_id(0);

const float step = (1.0/(float)n);
float partial_sum = 0.0;

// Each work-item computes chunk iterations
for(uint i=gid*chunk; i<(gid*chunk)+chunk; i++) {
float x = step * ((float) i - 0.5);
partial_sum += 4.0 / (1.0 + x * x);
}

// Each work-item stores its partial sum in the workgroup array
insideWorkGroup[lid] = partial_sum;

// Synchronize all threads within the workgroup
barrier(CLK_LOCAL_MEM_FENCE);

float local_pi = 0;

// Only work-item 0 of each workgroup perform the reduction
// of that workgroup
if(lid == 0) {
const uint length = lid + get_local_size(0);
for (uint i = lid; i<length; i++) {
local_pi += insideWorkGroup[i];
}
// It store the workgroup sum
// Final reduction, between block, is done out by CPU
workGroupBuffer[get_group_id(0)] = local_pi;
}
}

);

int main( int argc, char* argv[] )
{
int i=0;
float pi;
float *pi_partial;
size_t maxWorkGroupSize;
cl_int err;
cl_mem memObjects;
int niter, chunks, workGroups;
size_t globalWorkSize;
size_t localWorkSize;
cl_event event;

cl_platform_id platform; // OpenCL platform
cl_device_id device_id; // device ID
cl_context context; // context
cl_command_queue queue; // command queue
cl_program program; // program
cl_kernel kernel; // kernel

niter = 262144;
chunks=64;

err = clGetPlatformIDs(1, &platform, NULL);

// Get ID for the device
err = clGetDeviceIDs(platform, CL_DEVICE_TYPE_GPU, 1, &device_id, NULL);
clGetDeviceInfo(device_id, CL_DEVICE_MAX_WORK_GROUP_SIZE, sizeof(size_t),
&maxWorkGroupSize, NULL);
workGroups = ceil((float)(niter/maxWorkGroupSize/chunks));

pi_partial = (float*)malloc(sizeof(float)*workGroups);

// Create a context
context = clCreateContext(0, 1, &device_id, NULL, NULL, &err);

// Create a command queue
queue = clCreateCommandQueue(context, device_id, CL_QUEUE_PROFILING_ENABLE, &err);

// Create the compute program from the source buffer

program = clCreateProgramWithSource(context, 1,
&kernelSource, NULL, &err);
// Build the program executable
err = clBuildProgram(program, 0, NULL, NULL, NULL, NULL);
localWorkSize = maxWorkGroupSize;
globalWorkSize = niter / chunks;

// Create the compute kernel in the program we wish to run
kernel = clCreateKernel(program, "Pi", &err);

// Create the input and output arrays in device memory for our calculation
memObjects = clCreateBuffer(context, CL_MEM_READ_WRITE,
sizeof(float)*workGroups, NULL, &err);

err |= clSetKernelArg(kernel, 0, sizeof(cl_mem), &memObjects);
err = clSetKernelArg(kernel, 1, sizeof(float)*maxWorkGroupSize, NULL);
err |= clSetKernelArg(kernel, 2, sizeof(unsigned int), &niter);
err |= clSetKernelArg(kernel, 3, sizeof(unsigned int), &chunks);

err = clEnqueueNDRangeKernel(queue, kernel, 1, NULL, &globalWorkSize, &localWorkSize,
0, NULL, &event);
clFinish(queue);
cl_ulong time_start;
cl_ulong time_end;

clGetEventProfilingInfo(event, CL_PROFILING_COMMAND_START, sizeof(time_start), &time_start, NULL);
clGetEventProfilingInfo(event, CL_PROFILING_COMMAND_END, sizeof(time_end), &time_end, NULL);

double times = time_end - time_start;
printf("OpenCL Kernel Execution time is: %0.4f\n", times / 1000000.0);
err = clEnqueueReadBuffer(queue, memObjects, CL_TRUE, 0,
sizeof(float)*workGroups, pi_partial, 0, NULL, NULL);
pi=0;

for(i=0; i<workGroups; i++) {
pi += pi_partial[i];
}
pi *= (1.0/(float)niter);
printf("final result: %f\n", pi);

// release OpenCL resources
clReleaseMemObject(memObjects);
clReleaseProgram(program);
clReleaseKernel(kernel);
clReleaseCommandQueue(queue);
clReleaseContext(context);

//release host memory
free(pi_partial);
return 0;
}

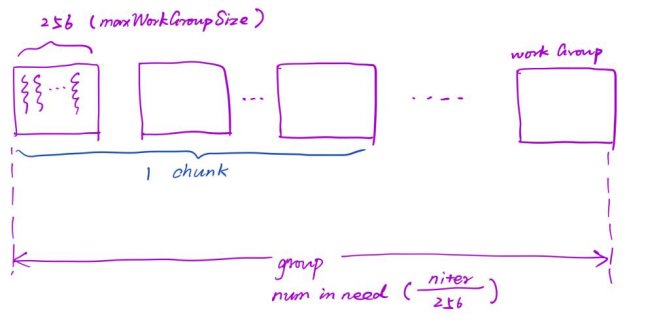
这里进行部分代码的分析,首先阐述chunk的概念,这里用如下的图进行表示。

所以这里的chunk指的是多个work group组成的组合。因此work group的数量是由所规定的chunk大小以及数据规模决定的。

1
2
3
workGroups = ceil((float)(niter/maxWorkGroupSize/chunks));

pi_partial = (float*)malloc(sizeof(float)*workGroups);

再向下理解,这里的local work size还是每个work group内的work item数量,这里取的最大,也就是本机器的256。但是这里的global work size与global size不同,他是将一个chunk的所有work group作为一个global work group,那么global work size就是chunks的数目。

1
2
localWorkSize =  maxWorkGroupSize;
globalWorkSize = niter / chunks;

这样就可以去理解kernel函数的内容了,首先它是将数据niter分成了chunk份,这就是为什么niter必须是chunk的整数倍,然后每个chunk内work item的数目就是要并行计算的数目,也就是每个chunk内做并行。

1
2
3
4
for(uint i=gid*chunk; i<(gid*chunk)+chunk; i++) {
float x = step * ((float) i - 0.5);
partial_sum += 4.0 / (1.0 + x * x);
}

然后对每个chunk的计算结果进行保存,并在lid为0的work item中进行结果的归约,然后将归约的结果作为这个work group(其实是这个chunk)的运算结果,然后这些chunk的结果要在kernel函数外,也就是CPU当中进行归约,从而计算出最终的结果。对应代码如下。

1
2
3
4
5
6
7
8
9
10
11
12
13
14
15
16
17
18
19
// Each work-item stores its partial sum in the workgroup array
insideWorkGroup[lid] = partial_sum;

// Synchronize all threads within the workgroup
barrier(CLK_LOCAL_MEM_FENCE);

float local_pi = 0;

// Only work-item 0 of each workgroup perform the reduction
// of that workgroup
if(lid == 0) {
const uint length = lid + get_local_size(0);
for (uint i = lid; i<length; i++) {
local_pi += insideWorkGroup[i];
}
// It store the workgroup sum
// Final reduction, between block, is done out by CPU
workGroupBuffer[get_group_id(0)] = local_pi;
}

这样就完成了PI计算的并行过程。

实验

由于这里的local size规定死了为最大的256,所以不宜做改变,所以这里我们更改chunks的数量。也就是修改在一个for内并行计算的部分,分别计算chunk数为1、2、4、8、16、32、64的时间消耗。这里的数据规模取26214400。
输出结果如下。

1 2 4 8 16 32 64
t/ms 8.3137 5.2593 2.5912 1.6443 1.2119 1.0183 0.9311

可以看到,随着chunk数目的增加,计算的效率越来越高,计算的时间消耗越来越少,并且计算时间的优化效果越来越弱。这说明在同一个chunk内的并行数越多,计算效率越高。

下面选择在chunk为64的条件下进行计算效率随数据规模的变化情况,这里的数据规模我们选择131072、262144、2621440、26214400、262144000。

131072 262144 2621440 26214400 262144000
t/ms 0.0324 0.0342 0.1155 0.9268 10.7321

可以看到,随着数据规模的增加,计算时间一开始增加缓慢,到后面也是以类似10倍的速率增长,原因与向量加法中的阐述相同。再增加数据规模,增加的时间就不是并行后的结果了,而是串行地等待前面的并行计算完,之后的再进行并行计算,所以时间的增量几乎就是数据规模的增量。

环境

macOS Big Sur Version 11.1